
Today’s episode is featuring some innovative and interactive activities that you can do whether you are face-to-face or virtual or both at the same time! I’ll start with the easiest activities to create and move towards the more complex.
One of the easiest activities to allow students to tell you what they know is by doing what is called a Brain Dump. Growing up in school, this is what teachers would tell us to do when we took a big test. Take a scrap sheet of paper and write down everything you know about a topic and refer to this when answering questions or writing an essay. This activity isn’t too different from that.
Greg Jung, created a Google Slides template, where instead of “dumping” everything onto a sheet of paper, students can tell you what they know about a topic in the first box and even record themselves talking about the topic and placing the recording in the second box on the left side. Jung’s students use a chrome extension called Record to Slides to record themselves. Check out this video to see how it works:
Then there’s room for you as the teacher to leave typed or recorded feedback.
I mentioned in the last episode that you can create Google Docs with pre-loaded comments. Here’s an example of that from Nichol Everett on Twitter:
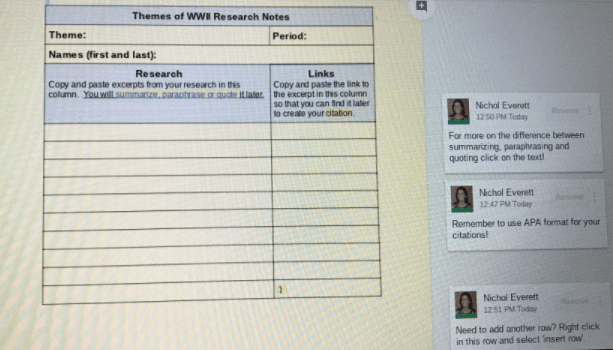
It’s a research guide to help her students understand how to summarize and paraphrase information and collect the links for sources and put them in the correct citation format. Nichol has comments off to the side with things for students to think about and links to other resources.
My friend Sam and I just tried this in Google Slides, making comments to serve as reminders for her ESOL students. We tested it and it works brilliantly!
If you need a reminder for how to force a copy with the comments, check out this video:
Jamboard has quickly become a crucial tool for collaboration this school year and one of the tech coaches in a neighboring district, Katie Fielding, came up with a way to pair Jamboard and presentations created in Canva with animated gifs. She created several different graphic organizers and added them as backgrounds to Jamboards. Here’s how she did it:
Step 1: Create a presentation template in Canva.
Step 2: Using the elements tool, search for animated gifs and add to your presentation.
Step 3: Make a graphic organizer.
Step 4: Save the graphic to your computer as a gif.
Step 5: Go to Jamboard and select set background and click the image button and upload your gif.
That’s it! It’s pretty easy and much more visually engaging. If you create your own, please share a link in the comments down below or tag me on Twitter or Instagram @mspriester_itrt! I’d love to see what you create.
Let’s stick with Jamboard for a minute. I recently noticed on Twitter an uptick on a newer strategy, I’ll refer to as Scratch Offs. It’s where you design an activity and put something in the background and cover it, making students “scratch off” or reveal what’s hidden. Of course as the saying goes, “In Education, is anything really new?” I’ve seen this idea years ago but with Smartboard’s software. At a previous school, we used to make activities where students would drag clipart of a magnifying glass over different objects to reveal what was “hidden”.
This idea is now making a comeback on Jamboard. One of the most popular ones I’ve seen is the digital rainbow scratch paper by Eric Curts. He created 12 different templates and a video to walk you through the process of how to use them.
You can check out the video here:
In his blog post, Eric says he would also like to see what students create and if they share their creations online, add the hashtag #controlaltachieve.
I found this scratch off activity on Twitter by Tricia Louis who, inspired by Eric’s post, used Canva to make a background and add it to Jamboard.
Her students then use the eraser tool in Jamboard to scratch off 3 random numbers to make a math problem. If you wanted to create something similar, you can use the same steps from earlier with the animated gifs, just instead of making a graphic organizer, create the activity you have in mind with shapes.
Do a search on Twitter or Google for “scratch off” jamboard, with scratch off in quotes, and you’ll find several other examples for vocabulary, phonics, probability, a random name picker and more!
Last week in my school district, the instructional team and our four ITRT’s, myself included, did a virtual professional development session on concurrent learning. I shared two small group activities that could be completed off-Zoom and showed a model for how to set them up in Canvas, our LMS. I would imagine this would be fairly easy to set up in other LMS’ too.
On the assignment page, I added a table with two columns for students to find their small group. Then, their tasks are linked below each group. For my model, I wanted to show students they will have two assignments to complete, but their focus for now is the first activity, which is linked to this Jamboard. Each group has their own Jamboard with editing rights. To set up this Jamboard activity, I first made the chart in Google Slides and downloaded it as a .jpg and inserted it into the Jamboard. Then students can answer the questions with sticky notes or a textbox.
Moving to the next assignment, you can see I kept the link to the first activity in case students need to refer to it again, and made the second activity stand out. This activity is linked to a Google Doc with a table for students to collaborate on and complete together. Each student in the group can add to each area or they could split up each question to complete among themselves.
I set the submission type for the assignments as “no submission” because students will not be submitting anything through Canvas, but as the teacher you can still add a grade in the Canvas gradebook. As long as there is a due date, the assignment will show up in the students’ to-do list.
The next activity is an old one I mentioned back in Season 4, Episode 1 – a Fliphunt! I recently saw it mentioned on Twitter again and completely forgot about this cool activity! A fliphunt is a digital scavenger hunt that takes place on Flipgrid. You create tasks for students to complete and challenge them to show what they know with video responses. Here are a couple of examples.
You can create a fliphunt as basic as this 4th grade Geometry one that has a table with the task title and description or something a little more visual with this skeletal system that includes checkboxes for each task.
I especially like this last example though on Reconstruction after the Civil War.
The teacher has gamified the fliphunt, allowing for choice. Each task has a certain number of points attributed to it and students need to receive 9 points. They can choose which tasks to complete that will get them to 9 points. I also like it, because there’s some physical activity added to the list too. You could spice this up by interspering community building activities to allow students to get to know each other better, such as having them interview each other in a breakout room and later individually share something they learned about the other person in a video response.
To create a Fliphunt, start with your content, unit, or lesson objectives and build your tasks. These should be varied and fun to keep students’ interest. You can do this by adding action verbs or making a story or theme out of the experience. Then create a task document, either a Google Doc or Google Slides that shows the task and links to where students will record their responses.
Task documents can continue the story or theme you may be using and can include checkboxes to have students complete a certain number of tasks or all of them or use point values or assign difficulty levels for the tasks. If you do this last one, use different text colors to indicate the degree of difficulty. Then make sure to add the task document as a Topic Attachment in Flipgrid. Have fun with it and be creative!
I haven’t talked about HyperDocs in a while, but they are perfect for the situation we are in now. I think Jennifer Gonzalez of Cult of Pedagogy puts it best:
HyperDocs are a digital document, where all components of a learning cycle have been pulled together into one central hub. Within a single document, students are provided with hyperlinks to all of the resources they need to complete that learning cycle”.
I’ve seen HyperDocs packaged within a variety of Google products: Docs, Slides, Sites, and even Forms AND Google MyMaps.
If you haven’t checked out MyMaps, you need to! I’ll have to think about putting that together for a future episode! I’ll work on that!
For right now though, I think the best HyperDoc template to consider is one based on the 5E’s: Engage, Explore, Explain, Elaborate, and Evaluate.
I like this template because it clearly shows students what they should be focusing on at any given time. This model also allows for both whole class work and independent work throughout the lesson. Here’s another template example that goes a little further and adds levels for applying concepts, sharing products and receiving feedback, and reflecting on learning progressions. Check out Wakelet for other examples.
Another reason I like the 5E Model is because it can be easily adapted for concurrent learning. Here’s an example lesson plan template from Stephanie DeMichele that shows how you can set up activities and what it will look like for in-person instruction and what it will look like for virtual instruction.
Designing a HyperDoc can be overwhelming if you’ve not done it before, so I suggest starting with a template and adapting for your use. Also, make the HyperDoc interactive! This is not a virtual worksheet; add in choices for students and opportunities for collaboration, along with multimedia resources. HyperDocs.co is a great resource for finding templates as well as already created HyperDocs by other teachers.
Have you used any of these activities before? If not, which ones would you be interested in learning more about?
