
Welcome to episode 2 of Tech Tuesday!
This week I’m focusing on effectively using Google Drive with classes. I want to share some tips on organization and implementation. For my school specifically, I will also share ways to implement Google with our LMS, Canvas.
Google has so much to offer, I know it can often be overwhelming. So let me break it down for you starting with creating new documents and files.
Creating New Documents and Files
There are now 3 ways to do this! I know that may seem like a lot, but it’s actually one of the things I like best about Google as they give users multiple ways to do the same things based on personal preference. I like how each of these 3 ways build on to the next giving you more options as needed.
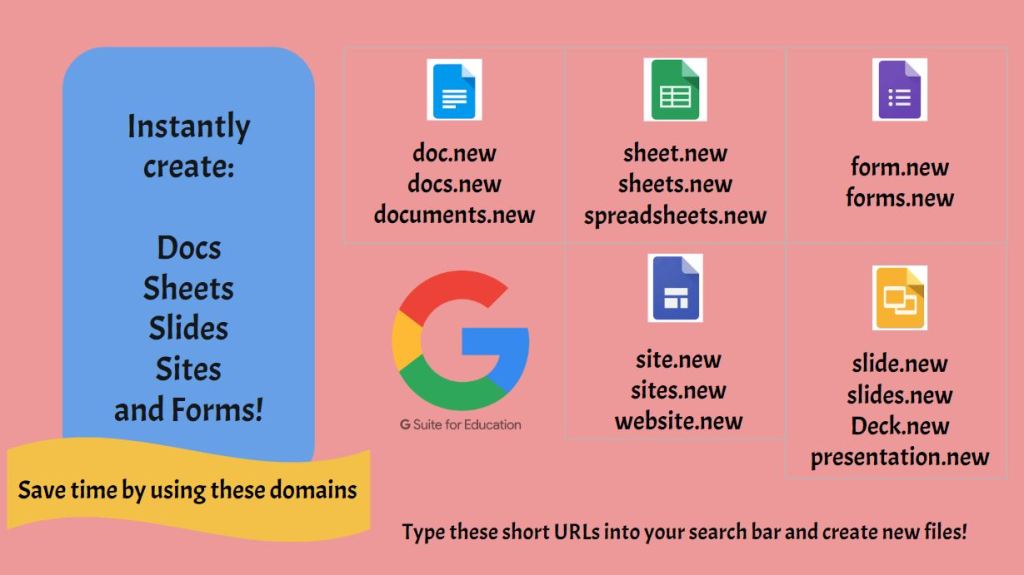
The first way is fairly new and this graphic below shows the multiple URLs users can use to create new documents in all the different apps. Just type in the URL to get a new document!

The second way is through the app’s direct home page which follows the same URL naming convention for each app. Type the name of the app.google.com. For example, Google Docs is docs.google.com.
The benefit of this way is that at the top of the app’s homepage, you can view various templates that can be used for class activities, plus any documents that pertain to that app. You can see all of the app URL home pages in this graphic:
Finally, the last way is to go through Google Drive and have access to all of your folders and documents, shared files, and all of the G Suite apps in one place. This is the way I prefer, because I am often going from one file type to another and accessing documents in different folders, so I feel like I can work a little more efficiently having access to everything I need in one place. However, it’s really a matter of personal preference, so choose the option that works best for you.
Organizing Your Google Drive
Now, one of the things I hear the most from teachers about Google Drive is that theirs is cluttered and it’s hard to find things. Now think about your students. If yours is cluttered, your students’ Drives probably are too. If file organization isn’t a priority it can become a mess very quickly!
The first thing you should do is create folders for the files you will access the most and categorize them. For example, I have a folder labeled meetings and within that folder, subfolders for department meetings, faculty meetings, etc. Every major aspect of my job has a folder and then I further break them down into sub folders.
To move a file into a folder, pick one of these two ways: drag the file up to the folder or using the left side navigation, navigate to the folder and drag the file.
Folders and files shared with you can also be added to your Drive and organized folders. In the shared with me area, right-click a folder or file and select Add to My Drive. You should see a pop up with a link to Organize. Click this and choose the folder you want to send it to.
Just like with the folder structure on a computer, Google automatically puts folders first in Drive in alphabetical order, followed by any loose documents that you haven’t put in folders. However, there are some other ways to clean this up.
If you access a folder or document more often than another and need it at the top of your list, you can rename it and label it with a number one or letter A and then the name of the folder or document. Keep adding numbers or letters as needed. To do this, right click on the folder or document and select rename. You can also change the color of folders to make them stand out. Again, right click on the folder and select change color. You may also want to go through the loose files and get rid of files named “untitled” and organize the rest.
Encourage students to follow these procedures, as well. As this is the first week of school in my district, this would be an appropriate time to have students clean up their files and create folders for their new classes. Students can also create a folder for any work from last year they want to keep and use it as an archive folder. I would also encourage you to take some time going over folder and subfolder structures with students. They may not be aware of this and even if they are, it’s still a good reminder.
Here’s two videos I found that may help students understand folder structure a bit better.
If you have any other tips on organizing Google Drive, please share at @mspriester_itrt on Twitter or Instagram.
Let’s move onto working more efficiently with Google Drive and talk about a new feature, the priority page.
Google’s Newest Feature
Some of you may have noticed this new addition to the navigation panel in the last couple of weeks. On this page, Google’s AI shows you the most relevant files it thinks is most important to you right at the moment based on previous activity. From here, you can take action on these files, as well as sort them into workspaces.
In workspaces, you’ll be able to see suggestions of related content to group together for easier access, such as multiple files related to the same project. Or create your own personalized Workspaces collecting any files you have access to, including content stored in your Drive or shared drives. To do this, you can right-click on any file and select Add to Workspace to dynamically group files as you work. This would be great for leadership or admin teams or group projects with students in class or after school clubs.
Sharing Class Assignments
There are also several different ways to share files for class assignments. Some of this will depend on your school’s LMS. My school has Canvas so I will cover this, but if your school has something different check to see if they allow Google files with direct integration.
Before I show how to directly integrate Google with Canvas, I want to go over a couple of things right in Google. You can, of course, share files directly with students or have them share with you. Use my tip from earlier to organize files shared with you and add them to your Google Drive. You can also consider creating a new folder labeled with the year and adding class assignments and share out the entire folder with students. This way at the end of the year, you can revoke sharing access to the entire folder.
However, I have a different method for you to try.
If you are sharing files with students, I would force them to Make a Copy instead. This way you share a link with students and each student will have their own individual copy of the file to work on. To do this, open the file you want to share with students. Look at the URL and at the end take out everything past the last slash that starts with edit and replace it with copy. Copy and paste this new URL where students can access it. When they go to the URL, they won’t be able to open the document before accepting that they have to make a copy of the file.
If you’re doing this in Canvas, you can paste the link as is or even better link the text that describes what the document is. So if this is a link to my syllabus then type the words Syllabus, highlight, and link the URL to the words.
Turning Work In
Now, you’re probably wondering how do students turn this work in? They can use either Google Forms or Canvas.
In Google Forms, you can create a form for students to add the share link to their work. Here’s one I have used before that asks students for their names, class period, and a place for the link. Once you have all the responses, use the spreadsheet view to not only click on the links to their work, but also the view the timestamp for when it was turned in.
Did you know you can also upload files through a Google Form? Add a new question and select File Upload. You can select the types of files, maximum number of files to upload, and the maximum file size. Responses will go into your Google Drive. This is great if you have students who used something other than Google for their assignment.
Now, I also mentioned you can turn in assignments through Canvas. When you create an assignment, scroll down to submission type and select online. Under online entry options, click the box labeled Website URL. You can also click File Uploads. The first entry option allows students to use the share link in Google to turn in assignments, while the second allows students to upload Microsoft or other programs.
On the student side, they will click on the assignment and see a blue submit assignment button. Once turned in, you will be able to see their responses in Speedgrader.
Google + Canvas
Now, there’s one other way you can use Google and Canvas together and that’s through the Canvas integration. Canvas allows certain programs to be integrated into their site and Google is one of them. Through this integration, you can embed assignments, which students can work on right in Canvas and turn in.
The first thing you need to do is make sure Canvas has access to your Google Drive. Go to one of your courses in Canvas and on the left side navigation, click Google Drive. On the new window, click the button that says authorize. This will allow you to see your files in Google Drive, but not really do anything with them yet, but the next step is the important one.
Create a new assignment and scroll down to submission type. This time choose external tool. Without putting anything in the search box, click find.
In the pop up window, scroll down to Google Docs Cloud Assignment. This will give you a view into your Google Drive folders, so then navigate to find the document you want to embed. Then click submit and select. After you click save, you will be able to see the embedded document. On the student side, they will see the embedded document, be able to type in it, and at the top see a blue “submit” button to turn in their work once they have completed their assignment.
Publish to the Web
What if you just wanted students to view a Google document, without being able to write on it? Google has a fix for that too, however it does involve a small bit of HTML. But stick with me, it’s really not that bad!
Google allows you to embed a document on to any website through an embed code. The first thing you need to do is publish it on the Google side.
Open the Google document you want to embed and under File find publish to the web. Click the embed tab. Check to see which of the options you want to include and then click publish and then ok to confirm. Copy the embed code. On many sites, there is an option to embed. Click this option and paste the code.
Here’s how to do it in Canvas: Once you have the embed code copied, go to the specific Canvas page you want the document to be embedded into and click Edit. Right above the box where you add text, click on the link that says, HTML Editor.
This is where it gets tricky.
If you leave and save now, the document will not look quite right. So we have to add some other HTML to resize it.
At the top of this graphic is what the embed code will look like. This extra code needs to go into the highlighted portion, after the quotation marks. This will allow the document to be at 100% for width and height. At the bottom, you can see what the embed code looks like once the extra code has been added. Click on the Rich Content Editor link to see the new view. Then click save and publish.
If you need to make changes to this document, you can change it in Google and it will be automatically updated on the Canvas page. You can also stop publishing if need be at any point, by going back to the document, selecting File>publish to the web and under Published content & settings, click stop publishing.
So, now you should have some good tips for implementing Google Drive into classes. However, if you have any other tips to share or questions about anything in today’s episode, please contact me @mspriester_itrt!
