
Welcome to a new episode of Tech Tuesday! I’m back after recovering from the flu and strep throat and ready to jump into this week’s topic! This week I’m focusing on Brush Ninja, an easy to use animated GIF tool.
Now originally, I asked Andrea Barbuzza, the MPHS Digital Media Specialist who first told me about this tool, if she would like to be a guest this week and do an App Spotlight. But when I went into editing to add a few more of my thoughts as well, I realized this is a pretty powerful tool, especially when combined with a couple of other tools or what is known in the edtech world as app smashing. So instead it became the main focus of this episode. I really hope you enjoy it!
Here’s Andrea to explain how you can use Brush Ninja.
CREATING ANIMATIONS WITH BRUSH NINJA
Hi, this is Andrea Barbuzza, the Digital Media Specialist and today I would like to show you a cool free web tool I discovered called Brush Ninja. It’s a free web tool that doesn’t require students to create an account and allows them to create and download GIF’s or Jif’s. I call them GIF’s with a hard “G” because the acronym stands for Graphics Interface Format and that “G” in graphics is hard, but potato, patato, to each his own.
So when you go to brush.ninja, you’re automatically taken to this creation screen. So you can make your GIF’S from blank, you can start with a picture or photo, you can start with the photos that they have on file; you can’t upload your own, unfortunately, but you can play with the speed of the frames, you can download the GIF and you can keep it. It’s simple and it’s fun. So this is one that I made just for fun, let’s see if I can find it. So I made this because I feel like we’re all needing a little bit of vitamin C at this point. So the photo was put in, Brush Ninja has a bunch of photos on file you may use; I’m hoping that eventually you’ll be able to upload your own photos, but this is in their file, and then, of course, I wrote the words and drew the blue lines and made my own little GIF.
I feel like it’s really cool because you can use it to illustrate concepts, reinforce things students have learned by getting them to create a slideshow with key information. I was thinking maybe for math you could display their thought processes, you know you can do two plus two equals four and make that a GIF. You can always just start over again, you can use your touch screen or you can use these or use your mouse. I’m not very good at using the mouse, I would much rather touch it. So what you do is after every line you press “D” and you can go to another frame. So if I just draw as I am pressing “D”, I am pressing “D” as I make this two, pressing as I make this plus, pressing as I make this two and the equals and the answer.
At the end, if I want to try it I will see that I have my own little GIF made that runs by itself. At the bottom, you can decide how long between frames, so here it’s only one second. I can make it longer in any of these, I can switch frames, I can create new frames. I can make different colors, so my screen can do colors. The kids who are artists will have a field day with this. It’s a great way to jot down ideas, you can use it as a whiteboard, you can use it to add some color to presentations, create a little animation of the topic being presented and embed it in a Google Slide; lots of different usages for this. I do want to show you that at the bottom, they have examples of animations, they have teacher resources. Here is some really cool animations that kids and teachers have done. Of course, you know anime, kids will adore it. This is cute.
Then, of course, they even have some teacher resources. It’s free, there’s all sorts of cool things you can do, here’s an example collection of animations that were done by students that are excited about fall break. So you know you can make it as simple or as complicated as you would like. Artists, like I said can have a field day, but even if you’re not crafty, it’s fun and engaging way for students to show their learning. They could make animated flashcards or explain a concept of, like a multi-step process.
You can start with a blank board or like I said they have images, as well. So you can download it and export it. Images? Settings, maybe? Yes, here we go. Images. Search for what you like, I did ocean and you have all of these free for you to use, photos that you can use as background and then you can write on them. So anything you create can be downloaded, put where you want it, I think it’s really cool, plenty of example education JIF’s on the site or GIF’s to give you inspiration. Let me know if you use this. Brush.Ninja and for what you use it because it is a cool resource, I think. Good luck!
Thanks, Andrea for sharing this great resource that encourages engagement and critical thinking. You can see more of what Andrea is sharing @MPHSCougarsRead.
BUT THERE’S SO MUCH MORE!
After watching Andrea’s video, I investigated Brush Ninja a little more. It is owned and operated by a single person, Ben Gillbanks and he didn’t design this for education, but according to his website is thrilled that it is being used by so many teachers and students and is willing to listen to new ideas and feedback for his product. Part of this feedback has recently led to adding some additional tools. On the left side of the canvas, is a pencil icon and when you click this, you get some more tools to use. You can add shapes, lines, and text and there’s also an eraser to correct mistakes. This definitely adds to the amount of ways you can use this tool.
Another great way to use this is after students finish designing their animations, to use it with Screencastify or WeVideo. This is where the app smashing comes in. We’re taking one tool that could be used completely by itself and combining it with another standalone tool, but by using the two together makes for a completely new product and new approaches to student understanding. So in this case, it allows students to not only illustrate but use their voice to walk others through their thought process. So for example, you could have students explain a recent math concept, such as how to solve multi-step equations by creating the animation in Brush Ninja and then record the screen using Screencastify or WeVideo while the animation is playing and talking over the animation to explain the steps to solve. Now for advanced users, you can appsmash one more time by uploading that screen recording to Flipgrid and letting students comment on each other’s work. That’s 3 tools in one assignment, but each takes the assignment to a new level.
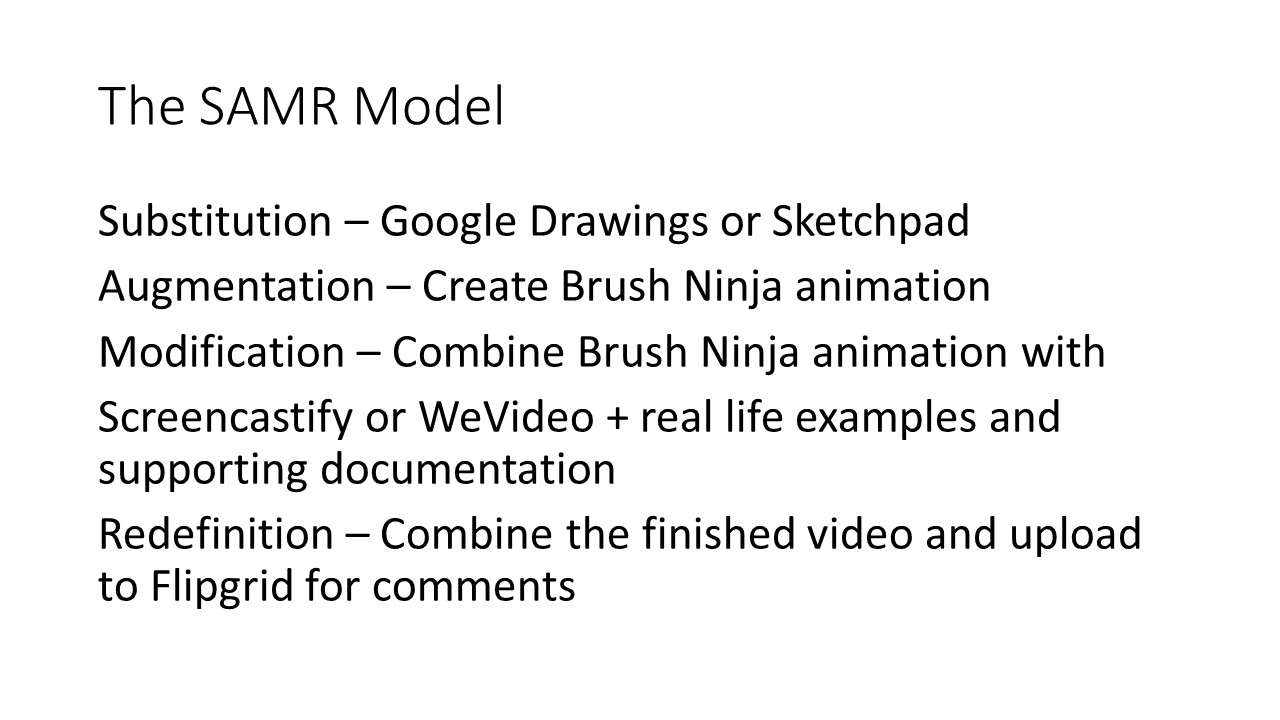
USING SAMR
So let’s put this in terms of the SAMR Model. If you’re not familiar with SAMR, go watch this episode from earlier this season.
Let’s say we’re creating a lesson about thermal energy and we as the teacher want to make sure students understand it. Before we had access to laptops, we could have had them draw a picture to represent each step. In Substitution, we use a technology tool to replace what we are already doing without the use of technology. It’s just replacing one thing for another. Brush Ninja does more than let students draw in it, it animates too. So using Brush Ninja is actually a step above Substitution, it’s Augmentation. So for this example to work in Substitution, students could use Google Drawings or Sketchpad.
Let’s move on to Augmentation, where students can use Brush Ninja to not only draw each step of Thermal Energy, they can label it and animate it too.
Now, you may want your students to do more than just draw or animate the process. For Modification, students can take the finished animation from Brush Ninja and combine it with Screencastify or WeVideo to record the animation while it’s playing and talk over the animation to explain the steps in more detail. Students can also discuss real-life examples or link to supporting articles or videos. We’ve now taken this from a traditional assignment and are starting to transform how students interact with the content. They’re also thinking more critically about this concept.
Finally, with Redefinition, students can upload their screen recordings to Flipgrid and comment on each other’s work. That’s a pretty cool way for students to learn and discuss a Science standard!
TECH NEWS
Google Drawings just got way easier to use and I’m very excited about this update! Previously, the only way you could insert a Google Drawing into a Google Doc, was to do it within Google Docs. You couldn’t just create something in Google Drawings and then insert it, because there wasn’t a way to do it. You had to go into Google Docs, click on Insert and create your Google Drawing in this little window and then insert it. would open and you would have to make or copy and paste your image right there and insert it.
It was something that very much frustrated me because I have items already created in Drawings that I couldn’t add to Google Docs. Well, Google finally changed this and you can now insert already created Google Drawings into Docs. Here’s how you do this: In Docs, click on insert image, then Drawing, then select from Drive and select the Google Drawing file you want to insert. You’ll also notice, the “+ new” option. This is the prior way, where you can create a drawing right in Google Docs and then add it. So, that’s still available too. Now the best thing is say, you have to make a change to your Drawing. Once you edit it in Drawings, in the upper right corner, there’s an update button and it will automatically update your drawing in Google Docs!
Okay, I’m going to back up here for a second because when I first heard about this I thought I understood, but when I went in to do the screenshots for this I realized I had it wrong. So it’s not actually in Drawings. You’re going to go to Drawings to update your drawing, and then you’re going to go back to your Google Doc and here in the browser you’ll see when you click on it, so if I don’t have…oh and see I’m still learning, even if you don’t have the object selected, there’s an update button right here. And that’s where you would update your Google Drawing. You could also be selected on the object and click update. Then it also shows you the links, or the link options if you actually have that object selected. So more we know as we learn a little bit more about this new feature.
That’s pretty amazing, especially for a Google geek like myself!
That’s all for this week’s episode! Again, a big thanks to Andrea for sharing Brush Ninja and thank you for watching! I’ll see you in two weeks!
